Sunday, February 25, 2018

Book Page Hydrangeas

Here's a very simple and fun project to add a little bit of spring to your decor . . . "hydrangea" book page balls.

All you need are some old book pages, a pencil, Styrofoam ball(s), hot glue gun and a scalloped circle punch.  You could use a plain circle punch but you don't get the true look of a hydrangea then.  But if that's what you have -- go for it!

For the first ball I used this old dictionary.  Then I decided to use other book pages with different 'shades' of paper and I liked seeing the contrast of different fonts and paper tints.
Punch out a bunch of the shapes and fire up the glue gun.

Now take a trip back to your elementary school days and wrap a petal over the pencil eraser end.  Add a drop of hot glue and press onto the Styrofoam ball.  I found that it's best to press it for just a few seconds before pulling the pencil out.


Just keep filling in all of the spaces.  I used a 2" ball, then a 1.5" ball and then a 1" ball.  

If you want to hang these, just insert a string before you begin adding the petals.  I didn't do that but I'm going to make more and will make them to hang.

Here are the three different sizes.

I love how these turned out and they are the perfect accent for the little cloche on the bedside table.  My girls found this little nest many years ago when walking home from school.  It was empty but it is so fine and delicate.  I don't know what kind of bird made it but it's so beautiful!  I found the eggs while on a walk in the forest preserve. They had fallen to the ground and they've been sitting in this nest now every spring.

It was also time to swap out my Valentine hearts on my multi-season boards, for tulips. My second project with my jigsaw . . . still trying to get the hang of that thing so these are a little 'rustic'.  While I was outside, guess what I saw?????

My crocuses are coming up!!  This is one of the most exciting and happy times of the year for this winter-hater! Oh it did my heart good to see those sweet blooms!  I hope wherever YOU are, you are enjoying the arrival of this "most wonderful time of the year" . . . at least in MY opinion!

On any given week (depending on how busy I am!) I love to participate in Link Parties.  These gals put a lot of time and effort into hosting these parties so I always want to show my appreciation by directing my readers to these blogs. 

Monday

Tuesday

Wednesday

Thursday

Friday

Saturday

Sunday


Monday, February 19, 2018

Chocolate Raspberry Tart

 
My husband wanted to make reservations to take me out for Valentine's Day but I'd really much rather fix an elegant dinner at home (that was one of my gifts to him). I knew this tart was going to be dessert!  Super easy, with just a few ingredients yet it really LOOKS like it took you forever!
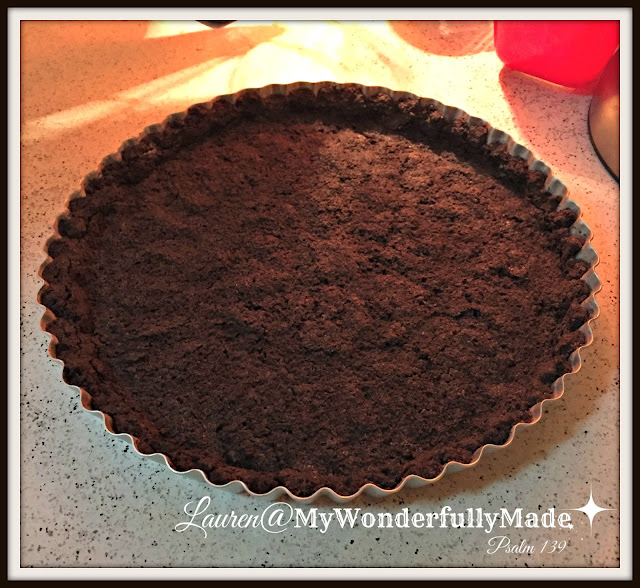
The crust is Oreo cookies ( I used the thin ones since I didn't really want a lot of the cream filling in this) crushed in a food processor and mixed with melted butter then baked in a tart pan with removable sides.
The recipe calls for dark chocolate (which I'm not a fan of) so I did two bars of dark and one of milk chocolate. You really would NOT want to do this with all milk chocolate - I think it would be way too rich!
Coarsely chop the chocolate and place in a heat-proof bowl.
Pour your heated heavy cream over the top, covering the pieces and let sit for 4 minutes.
Once it sits, you'll be able to blend the chocolate into this smooth, glossy goodness.
Pour into your cooled crust and refrigerate a few hours.  ( I actually only had mine refrigerate about half an hour before decorating and it was fine.)
Top with fresh raspberries and sprinkle with powdered sugar.
It was SO SO SO good - my husband was very impressed and we enjoyed our dessert with coffee and a small glass of Amaretto.
How fun are these cups? 
I made one of these for my husband (I got the idea from Pinterest of course!). He is such an amazing man that it was very easy to come up with 52 things that I love about him!

We started off our meal with a caprese salad with balsamic reduction


Then we moved on to a super easy and tasty Crab Bisque. and bread sticks formed into the shape of hearts.


Next we enjoyed our steak dinner with herb roasted potatoes and asparagus


It was a lovely evening and in my opinion, SO much better than going out to a crowded, overpriced restaurant!


Recipe from House of Nash Eats

Crust
  • 1 1/2 cups 24 Oreos, finely crushed in a food processor or blender
  • 6 tablespoons melted butter
Filling
  • 12 ounces dark or semi-sweet chocolate, chopped
  • 1 1/4 cups heavy cream
Finishing
  • 2 pints fresh raspberries
  • Optional powdered sugar or chocolate curls for garnish
Instructions
  1. Heat oven to 350. 
  2. Mix the cookie crumbs and melted butter together in a bowl, then press the crust ingredients firmly into the bottom and 1 to 2 inches up the sides of a tart pan.  It can help to use a glass or flat-bottomed measuring cup to do this step.
  3. Bake the crust for 8 minutes, then remove from the oven and cool completely.
  4. Meanwhile, place the chopped chocolate into a heat-proof bowl.  Heat the heavy cream in a small saucepan over medium-low heat until very hot but not boiling.
  5. Pour the cream over the chocolate and let it sit for four minutes. Then stir using a rubber spatula until the chocolate is completely melted and the chocolate and cream are combined.
  6. Pour the chocolate ganace over the Oreo cookie crust and smooth out the top, if necessary.
  7. Place in the refrigerator and let set for 2 hours. When done chilling, decorate the top with raspberries by arranging them with the conical side up, closely touching. If desired, dust with powdered sugar before serving.

On any given week (depending on how busy I am!) I love to participate in Link Parties.  These gals put a lot of time and effort into hosting these parties so I always want to show my appreciation by directing my readers to these blogs. 

Monday

Tuesday

Wednesday

Thursday

Friday

Saturday

Sunday


Thursday, February 15, 2018

Garlic Knots


Eventually I need to get back to CRAFTING rather than baking but for now, here's another thing I just tried, Garlic Knots.  I was visiting my friend Diane at Lavender Dreams and she had posted about making these Garlic Knots from a recipe she found on Allrecipes.
You can use store bought dough but since I'm enjoying my KitchenAid dough hook attachment, I opted for making my own dough.  You can see the recipe on Diane's site.


After the first rise, I divided the dough into four pieces.


This dough scraper is one of my favorite tools because you can use it to measure, cut and then clean off your cutting board.


Just head on back to Kindergarten and roll those 'snakes' of dough (quite therapeutic).


Form the knots loosely so they can rise and still keep their shape.


Nice and puffy and ready for the oven. I like that these rose quickly both times so start to finish it's just about and hour and a half, plus baking time.


Hot and fresh from the oven and ready for a nice, garlic butter bath!


I went a little light on the garlic (just my preference) and I didn't have the 'good' shredded Parmesan but I do like how they turned out and they made a wonderful compliment to several dinners.  Thanks Diane for sharing these with us!

On any given week (depending on how busy I am!) I love to participate in Link Parties.  These gals put a lot of time and effort into hosting these parties so I always want to show my appreciation by directing my readers to these blogs. 

Monday

Tuesday

Wednesday

Thursday

Friday

Saturday

Sunday


Saturday, February 10, 2018

Best Banana Muffins - REALLY!

We've gotten just about a foot of snow so far this weekend with another 6-8" expected tomorrow so what's a winter-hater like me to do but bake.  
Now I think we ALL have made our share of banana breads and muffins in our lifetime that claimed to be the 'best'. That being said, toss all the other recipes because baby, THESE really, truly ARE the best banana muffins I've ever made!
I like going to Allrecipes.com even more than Pinterest because on Allrecipes, you can find recipes by rating/review, how many times it's been made, etc.  This muffin recipe has been made 15,000 times, has 9,758 reviews and is a solid 5-star rating! So I knew I just had to try these Banana Crumb Muffins  (click on link to go directly there but I'll also give you the recipe below)
The only change I made to the original recipe was based on other reviews that suggested substituting the melted butter with oil.  The crumb topping really is amazing. I like to use my mini-food processor to make my crumb toppings because it creates a fine, uniform crumble to sprinkle on top.
We will be enjoying this with a crock pot of chili and some homemade cornbread for dinner tonight!

Allrecipes.com Banana Crunch Muffins

Ingredients

  • 1 1/2 cups all-purpose flour
  • 1 teaspoon baking soda
  • 1 teaspoon baking powder
  • 1/2 teaspoon salt
  • 3 bananas, mashed
  • 3/4 cup white sugar

  • 1 egg, lightly beaten
  • 1/3 cup butter, melted
  • 1/3 cup packed brown sugar
  • 2 tablespoons all-purpose flour
  • 1/8 teaspoon ground cinnamon
  • 1 tablespoon butter

Directions

  1. Preheat oven to 375 degrees F (190 degrees C). Lightly grease 12 muffin cups, or line with muffin papers.
  2. In a large bowl, mix together 1 1/2 cups flour, baking soda, baking powder and salt. In another bowl, beat together bananas, sugar, egg and melted butter. Stir the banana mixture into the flour mixture just until moistened. Spoon batter into prepared muffin cups.
  3. In a small bowl, mix together brown sugar, 2 tablespoons flour and cinnamon. Cut in 1 tablespoon butter until mixture resembles coarse cornmeal. Sprinkle topping over muffins.
  4. Bake in preheated oven for 18 to 20 minutes, until a toothpick inserted into center of a muffin comes out clean.

On any given week (depending on how busy I am!) I love to participate in Link Parties.  These gals put a lot of time and effort into hosting these parties so I always want to show my appreciation by directing my readers to these blogs. 

Monday

Tuesday

Wednesday

Thursday

Friday

Saturday

Sunday

Tuesday, February 6, 2018

Homemade Cinnamon Yeast Rolls


These bitterly cold, snowy days are not good for much . . . except baking things like these wonderful, oh-so-good, cinnamon rolls!
My recipe comes from Two Peas and Their Pod and is not only a fantastic recipe but there are some cute pictures of her dad (this is his recipe) making his famous cinnamon rolls.


Once the dough has risen once and been rolled out into a rectangle, you spread it with soft butter.


Next comes a thick layer of brown sugar and cinnamon.  You can add raisins (I didn't have any) if you like. I think the next time I make these, I'll add raisins and more of the cinnamon sugar mixture.


After slicing (use a piece of dental floss to get nice, clean cuts) they went into a generously greased pan to rise once more.  I set my oven to 250 degrees and set my bowl/pan of dough on TOP of the stove. The warmth coming up from the oven makes these rise really well.


Here they are all puffy and ready for the oven. 


Out of the oven and ready for a nice icing bath!


Is your mouth watering yet??


These were SO SO good -- tender inside and so gooey!
In order to spare my hips any further insult, I kept a few at home and sent the rest to church with my hubby for the staff to enjoy!
I have copied the recipe directly from Two Peas and Their Pod's site below:


  • Rolls:
  • 2 packages yeast (4 1/2 teaspoons), dissolved in 1 cup lukewarm water
  • 6 tablespoons shortening (Crisco)
  • 1 cup granulated sugar
  • 8 cups unbleached all-purpose flour (you might need more if the dough is sticky, up to 9-10 cups)
  • 2 cups hot water
  • 2 eggs, beaten
  • 1 tablespoon salt
  • Softened butter (about 1/2 cup total)
  • Brown sugar (about 1 1/2 cups total)
  • Raisins (about 1 cup total)
  • Cinnamon (about 2 tablespoons total)
  Icing:
  • 4 tablespoons unsalted butter, softened
  • 2 cups powdered sugar
  • 4 tablespoons milk
  • 1 teaspoon vanilla extract

DIRECTIONS:


  1. Add yeast to cup of lukewarm water and sprinkle in a little sugar. Set aside for about five minutes.
    2. In the bowl of a stand mixer, add shortening, sugar, and salt to hot water and beat for 30 seconds, using the beater blade. Let cool to lukewarm temperature. Stir in 2 cups of flour and mix until smooth. Add yeast mixture and mix until well combined. Mix in the beaten eggs.
    3. Gradually stir in the remaining flour and mix with the dough hook for about 2 minutes. Remove dough from the bowl and place on a lightly floured counter. Knead by hand, add a little flour if the dough is still sticky. Knead until dough feels satiny and smooth.
    4. Cover and let rise for 30 minutes. After the dough has doubled in size, remove it from the bowl and divide it in half. With a rolling pin, roll one half of the dough into a rectangular shape, about 22 X 13 inches. Spread dough evenly with half of the softened butter, about 1/4 cup. Sprinkle dough with half of the brown sugar, raisins, and cinnamon. You can omit the raisins, but my family loves them.
    5. Roll up dough into one long roll. Cut rolls, using a piece of dental floss or thread, about two inches thick. Place rolls in greased 9X13 baking pans. Now follow the exact same steps with the other half of the dough.
    6. Let the rolls rise until double in bulk. Preheat oven to 350 degrees F. Bake for 20-30 minutes or until cinnamon rolls are golden brown on top and cooked in the middle. Every oven is different so check at 20 minutes to be safe, but it might take longer. You don’t want them to be doughy in the middle. Time will also vary based on how big they get during the second rise. Ours take closer to 28-30 minutes. Remove from the oven and let the rolls cool to room temperature.
    7. While the rolls are cooling, make the frosting. In a medium bowl, whisk together butter, sugar, milk, and vanilla. Frost the cooled cinnamon rolls generously!

On any given week (depending on how busy I am!) I love to participate in Link Parties.  These gals put a lot of time and effort into hosting these parties so I always want to show my appreciation by directing my readers to these blogs. 

Monday

Tuesday

Wednesday

Thursday

Friday

Saturday

Sunday