Thursday, June 30, 2011

Tomato Red Chandelier

These chandeliers are all over 'blog land' and I couldn't resist joining in!  I got this beauty at my local ReStore for $8.00!  This is what she looked like 'before':
  I had a coupon for $5.00 off from my local hardware store and that covered the can of spray paint.  After removing all of the wiring, etc. I reattached the candle holders using E6000 glue.  I gave it two coats of paint and finished off with two coats of clear matte spray paint.  After I got most of it covered, I hung it on one of the hooks in my garden which worked great for seeing all of the spots I'd missed!
 I wanted to add some "bling" to it but I had none.  However, I do have an abundance of old skeleton keys so I decided to spray them red and hang them on the hooks.

 Since I don't have any low tree branches to hang it on I decided to hang it in my gazebo.
 My only change to this is going to be using BATTERY operated candles -- granted it was windy when I lit them tonight but I think I don't want to hassle with real candles.  
 Had to add this one -- I LOVE Picassa for photo editing -- so many fun features to play around with!
I have at least two more outdoor lighting projects I want to finish and will be posting those soon!


Tuesday, June 28, 2011

Outdoor Lighting Fun

My son's wedding is fast approaching and one of the many things I'm working on is a casual, outdoor dinner in our backyard which will follow the reception.  Since it is a smaller wedding, I wanted to be able to invite friends and neighbors over to help us celebrate who we couldn't invite.  The happy couple will be well on their way to their honeymoon and this will be a time for everyone to gather, get comfy, relax and enjoy some food and HOPEFULLY a nice evening outside.  I haven't come up with a "rain plan" yet . . . that's for another day!  I've seen so many great ideas out there from talented bloggers featuring outdoor lighting (many that I plan to copy!) so I thought I'd feature them here and maybe you'll find some that you'd like to try!
Amanda over at The Ivy Cottage created these using those old glass telephone insulators! Stop over and see all of the different ways she shows how to use these.
Deneen over at Dreaming In Color created this adorable outdoor chandelier -- I bought the exact same one at the Habitat for Humanity ReStore just a few weeks ago . . . mine is getting a bath in tomato red and you'll be seeing the finished product soon!

Beachcomber26 took an old ladder, added some pots and jars of flowers and jars with candles to create these adorable way to light up the night!  Funny thing . . . I have an old ladder like this with the flower pots on it . . . just have to add the jars with candles! 
What do you get when you combine a tuna can, wood screw, copper adapter and an old paint stick? A beautiful garden light!  Diane from In My Own Style took these simple things and created this hurricane lantern!  She gives some variations and suggestions for using other materials as well so anyone can create these.

And finally, Canning With Kids created this chandelier using canning jars and a canning basket!  Think of the possibilities?! 

So are you inspired? I'm sure you have even MORE great ideas for outdoor lighting -- share them with us!  I'm off to enjoy the summer evening in my gazebo!


Wednesday, June 22, 2011

Tiny Table Facelift & First Chalk Paint Project


I found this little table at my local thrift store marked $15.00 but it was of course "Half Off Furniture Day".  As you can see from the pictures, it was in pretty sad shape but I liked the details on the top, legs and the lines of it.


After a fair amount of sanding, I stained and then applied two coats of polyurethane.  I didn't try to remove the dark stain from the grooves or edges of it because A. That would have taken FOREVER and B. I liked the look of them dark.


I decided to use this piece for my first attempt at chalk paint.  Now here's the great part (for me) . . . a stockist (the people who sell chalk paint) lives five blocks from me.  I called her and she grabbed what I needed at the store, brought it home with her and I picked it up!  


I applied two coats of Cream Chalk Paint.  I distressed the piece slightly and then applied a coat of Annie Sloan Clear Wax.  Now, I have been told you can either distress first and then wax or vice versa.  Next time I'll wax first, distress and then wax again and see if it makes a difference.


For now it's in my living room.  If I decide to keep it I'm going to add a small lamp to the top and move the books underneath.  Either way, I think it was $7.50 well spent!


Friday, June 17, 2011

Faux Weathered Beach Sign

Since I did not make the "cut" for the next round of One Month To Win It (Sadness) . . . I did not get to enter this project.  The next round theme was 'beach' and I am so NOT a 'beachy' person so this was a real challenge for me but this is what I came up with! 

I started out with a package of 18" garden stakes from Home Depot ($4.99) and a bag of sea shells from the thrift store ($2.00).  I can't hammer a nail to save my life so I just laid out the stakes and attached the two support sticks using wood glue and that worked perfectly. 

To give the wood that "aged", look I filled a container with apple cider vinegar and threw in a few pieces of steel wool.  I let the wool soak for about an hour (you're supposed to let it set 24 hours but being lazy and impatient I didn't) and then began rubbing the pads over the wood.  
After about two hours, this is what it looked like!  The wood continued to 'age' even as the days went on and you'll see that the final product really DOES look like drift wood!

Using stencils and white acrylic paint, I added this Bible verse from Psalm 139.  Now you can probably see I made a few mistakes in the "were I to" section that show up in the photos but in person, you can't see them.  To correct them, I just sanded them out and rubbed a little bit of watered down wood stain to cover them.  I think the flash just highlights them in the pictures.

Using my favorite E6000 glue, I added the seashells and some pieces of wood mulch.


The large gray shell already had a row of naturally made holes so I threaded some twine through them and wrapped it around the upper support so this piece hangs freely. The final step was to give the entire piece a few heavy coats of polyurethane to protect the wood from the elements and rotting!
Here is the finished project out by my front porch.  
See how old and weathered it looks now?  


Sunday, June 12, 2011

Tea Trays from Frames

Some of you may recognize this post -- I submitted it for Round 2 of "One Month To Win It" and it helped move me on to Round 3 but of course I couldn't post it here until voting ended!

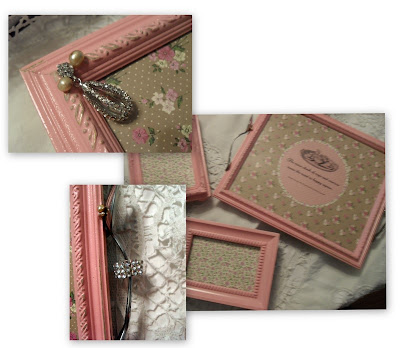
I have been looking for a nice little tray for serving tea, coffee, etc. and haven't found anything to my 'liking' so I created three using frames and some porcelain knobs from my local thrift store.  The two smaller frames to make a 'set' for holding spoons, cream, sugar, etc.  I began by taking them all apart and removing the glass.  I primed and then painted them in this pretty pink color to match the decorative papers I planned to insert.  (It should be noted that for some unknown reason to me, the paint 'crackled' in parts.  I was going to sand and repaint but I actually thought it added to the 'aged' look of these!) Once they were painted, I distressed them a  little with sandpaper.  
For the main tray I added this fun quote and the vintage tea service image from The Graphics Fairy and inserted the papers into the frames. 

The knobs for the 'feet' were attached also using E6000 glue.   The handles are old spoons I had (also attached with E6000. . .  can you tell I LOVE this glue??) but before I put one of the spoons on, I slipped an old elastic rhinestone ring over it.  

This broken earring was added on using a jump ring to the existing picture hanger that for the life of me I could not remove no matter how hard I tried so . . . I decided I would work WITH it instead!

To add to the vintage charm of these, I added some more 'bling' (a.k.a. old jewelry) Hmm. . . Let's see if you can guess how I adhered the bling??. And now I'm looking forward to serving up tea and treats on these little beauties!

Friday, June 10, 2011

Anniversary Tea and GW Finds


Yesterday was our 27th wedding anniversary.  Being low on funds and low on time (my husband had to be at a wedding rehearsal as he’s performing their wedding today!) I decided to have a romantic tea for him when he came home.  Earlier in the day I stopped by my local Goodwill store and found some real treasures to add to my ‘tea service’ collection!


These candelabra knocked me out at $4.99 each! I found the first one and put it in my basket and then over on a shelf with luggage and other ‘stuff’ was ANOTHER one! I was giddy!  And let me tell you – these girls are HEAVY! “How heavy” you ask?  They’re so heavy that ONE of them on my passenger seat was activating the seat belt light!   I don’t know what they’re made of but they are staying as is – to me, they’re perfection!


These six plates were .99 each and will be a great addition to my Victorian Teas!  

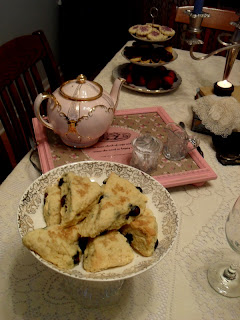
For our Anniversary Tea I made Blueberry Lemon Sugar Scones, Devonshire Cream, Lemon Curd and used some Strawberry Rhubarb Jam made by a good friend of mine.  We then enjoyed Fruited Almond Chicken Salad and Tuna Salad Sandwiches.  Finally I made some sugar cookies and dipped strawberries in chocolate.  I cheated and bought the adorable little éclairs at Aldi!  We enjoyed all of this with Provence Rooibos tea and Billy Holiday playing in the background.

 
For my centerpiece I was able to use the little ‘floor protectors’ I found a few weeks ago at an antique store to hold tea lights and a stack of books I had just removed the covers from and spray painted.  The old eyeglasses I’ve had for so long, I don’t remember where I got those!
 
It was a lovely, relaxing way to celebrate our day!'

I'm submitting this and my wedding post over at Angelic Accents where Stephanie is hosting her 2nd Annual Wedding Blog Party!  Check it out -- so fun to see all things 'wedding related' including great posts from ladies about THEIR weddings!


Thursday, June 9, 2011

Have You Seen These People?

Have I seen these people? Yes.  Everyday.  Although they certainly don't look like THAT anymore!


27 years ago today I married the love of my life. 

After going to get my hair done, I came back home and got dressed upstairs in the attic bedroom (because it was the only room in the house with A.C.!) and I remember thinking, “This is the last time I’ll be here as a single woman”.  While most of that day is a blur (except for the fact that it was 90 plus degrees and there was no air conditioning in my parents’ car – yes, no limos back then, we just drove to the church in a regular, old car) I remember telling myself to TRY to focus and TRY to remember what was going on!  

The wedding took place at The Chapel in Akron, Ohio where Matt and I met while attending the college ministry there.  I was so excited for Matt to see me walk down the aisle.  I couldn’t wait to become his wife and begin our new life as a married couple!  We all put on the ‘finishing touches’ in the “bridal room” at the church (probably just an usher’s room or something!) and the girl I paid to come and apply all of our make-up, never showed so my cousin who was a very classy gal grabbed all of her make-up and set to work on us!  Between all of us and our ‘make-up’ kits, we all ended up looking pretty decent!  Pictures were snapped and off we went to the sanctuary. 

I remember telling my dad I think I’m going to faint – he just squeezed my arm really tight, gave me a kiss and said, “Relax – it’s going to be fine – now here we go!”  I remember looking at Matt and saying the vows and thinking -- this is IT!  I have found the one I want to be with for the rest of my life (yes, I REALLY do remember thinking that!)  The next thing I remember is kissing him and turning around to face our friends and family and hearing, "It is my privilege and joy to introduce to you Mr. & Mrs. Matt Zaubi" and heading down the aisle accompanied by applause!


After a buffet reception in the church fellowship hall we set off for the night to the Quaker Oats Hotel downtown and then drove the next morning  to Vermont for our honeymoon in my parents’ car (yep, the one with no A.C.)  -- hey, times were simpler back then and honestly – we had a blast!  


Now don’t most of us look back at our wedding photos and have that “What was I thinking!!??” moment?  That’s what I do when I look at that hat with the ‘bee-keeper’ veil!  The gown still hangs in my closet (I’m quite sure neither of my daughters will want to wear it!!) and I’m thinking it’s going to make some sweet keepsakes for my daughters or maybe grandkids (gulp!) someday ‘cause I’m pretty sure it will never make another trip down the aisle of a wedding!  


You truly have NO idea what marriage is about until you've lived it with all of its 'ups and downs'.  If you're married you know that those 'warm, fuzzy gosh-I-can't-live-without-you' feelings are NOT always there.  Love IS a choice, a decision, a commitment and without the Lord at the center -- I can't imagine how you do it!  He is the "Glue" (I'm pretty sure that name is not in Scripture anywhere) and I'm grateful that he chose Matt for me!!  And with that, I leave you with a few ‘vintage’ pictures from a warm, June day in 1984 in Akron, Ohio where our journey began. . .


And finally, while we're certainly not as old as this couple . . . I want to be like them when I grow up . . . still loving my husband and life and ENJOYING each other!