Thursday, February 28, 2019

Banana Cake with Lemon Cream Cheese Frosting


How many of you have a freezer full of nice, overripe, black bananas? Raise your hand.  I personally do not like bananas but my husband does so I always buy them for him but bananas don't last long so each week I probably toss at least one or two in the freezer.  When I cleaned my freezer the other week, I found bananas EVERY WHERE.  When it was all said and done . . . I had 18 bananas in there!! So I went on a hunt for a recipe that would use a lot and my oh my . . . 


I found this AMAZING recipe from Spend With Pennies. Not only is it an astoundingly good recipe, but I used up 5 of those 18 bananas.  As I said, I do NOT like bananas but I will make an exception when they are combined with wonderful things like butter and sugar.


I was having company so I decided to make this as a layer cake and pipe the frosting on.  I coated the sides with finely chopped walnuts as well.  This is a moist, crumbly cake so I did what is called a 'crumb coat' on the sides.  You spread a thin layer of icing to adhere the crumbs to cake, refrigerate to harden that coat of frosting and then you can top with a clean base of frosting. I wish I had piped a pretty edge around it before doing the roses but oh well, next time.


The top was also very moist and crumbly so I spread a thin layer of frosting on top before adding the roses.  Of course this would be wonderful just as a 9X13 which is how the original recipe is done.


You could add walnuts to the cake as well which I may do the next time.  It was very moist and everyone loved it.

Ingredients

  • 1 1/3 cup mashed bananas
  • 2 1/2 tablespoons lemon juice divided
  • 1 1/2 cups milk
  • 3 cups flour
  • 1/2 tablespoon baking soda
  • 1/4 teaspoon salt
  • 2/3 cup butter softened
  • 1 cup white sugar
  • 1/2 cup brown sugar
  • 3 large eggs
  • 1 teaspoons vanilla
FROSTING
  • 8 oz cream cheese
  • 1/3 cup butter softened
  • 3-3 1/2 cups powdered sugar
  • 1 teaspoon lemon juice
  • 1 1/2 teaspoons lemon zest from 1 lemon

Instructions

  1. Preheat oven to 350°. Grease and flour a 9 x 13 pan.
  2. Place 1 1/2 tablespoons lemon juice in a measuring cup. Top to 1 1/2 cups with milk. Set aside.
  3. Mix together mashed banana with 1 tablespoon lemon juice, set aside.
  4. Beat together butter, brown and white sugar until combined. Add in eggs one at a time and vanilla. Mix on high until light and fluffy (almost the texture of frosting).
  5. Combine flour, baking soda and salt in a medium bowl. Alternate adding flour mixture and milk to egg mixture stirring just until combined. (Do not overmix). Fold in bananas. Pour into prepared pan.
  6. Put into the oven and reduce heat to 300 degrees. Bake 60 – 70 minutes (see note below) or just until toothpick inserted in center comes out clean (do not over bake).
  7. Remove from oven and place in the freezer for 45 minutes to make the cake extra moist. Cool completely before frosting.
FROSTING
  1. Cream together butter & cream cheese until fluffy. Add in lemon zest and juice.
  2. Add powdered sugar a little at a time until you reach desired consistency. Spread over cooled cake.


Just look at that pathetic face!  Hudson is singin' soprano now, if you catch my drift.  The world can only handle one Hudson so yesterday, we did the deed and he is none too happy about 'the cone of shame'.


When I'm with him and can watch him, he is allowed to wear a onesie and no cone.  He's not thrilled about that either but it's better than the cone!

I've been down again this week with another bad cold/bug so we are both laying low and looking forward to warmer, brighter days . . . who knows WHEN that will be!

Friday, February 22, 2019

Dollar Store St. Patrick's Decor


Since Easter comes later this year, I have put out my St. Patrick's Day decorations after taking down my Valentine's Day decorations.  Most of this came from the Dollar Tree (not all this year but from years past as well).  This is my dining table centerpiece that I made to be a multi-season/holiday decoration.  Click HERE for instructions and to see how it's been decorated.  I've also decorated it for Spring but I don't think I did a post on that.


Today at the Dollar Tree they had these bags of foam shamrocks in different sizes and gold coins - so cute! 


I threaded a tapestry needle with this gold and white string and just slid it through then tied these onto the branches.


While I don't have a lot of St. Pat's decorations, I have enough that gives the rooms a fun pop of green, gold and silver.  This is a reclaimed wood molding piece turned upside down and mounted on the wall.  I have a small collection of vintage salt and pepper shakers on here.


I always have fun with this ledge in my living room.  


All except the fabric and the shamrock picture are from the Dollar Tree.  The picture is a faux four leaf clover that I made and framed in an old picture frame.  Instructions for that are HERE.


Here is Eileen, my vintage typewriter dressed for the holiday.  She's another fun piece (Read about how I 'scored' her HERE.) that I like to decorate for the holidays.


I do a lot of 'multi-season' decorating like this big frame in my bathroom.  I change out the pictures for each season and holiday and they all are kept right in the frame so no need to go looking for them!  I just found this quote/verse and loved it so added a vintage image and that was it!

Looking, waiting, wishing, hoping for Spring to come soon but in the meantime, I'll settle for a little "green" inside.

Tuesday, February 19, 2019

DIY Dog Collars


 If you have a dog, you know that collars are not cheap and cute collars are hard to come by . . . especially for boy dogs.  The solution . . . make your own!  There are lots of free tutorials out there but I found this one to be the most helpful at Halifax Dogventures.  It looks more complicated than it is and if you have a dog collar already, you can look at how it's assembled to help you.

Here's what you'll need:

  • Collar hardware (I purchased these from Amazon. There are ten sets for a cost of only 12.99. Crazy considering you'd pay at least that much for ONE collar.)
  • 1/8 yard of fabric
  • 1/8 yard of fusible medium weight interfacing
  • Sewing machine, thread, etc.

Measure your dog's neck and double that for the length of your fabric.  I cut one piece 20" long by 3" wide to make a 3/4" wide collar.  Cut the interfacing the same width but 1" shorter and center on wrong side of fabric; press. Press piece in half lengthwise then open up.


Press ends in; press each side in toward the center fold. Then fold in half again. Stitch around all edges.


Thread on the tri-buckle piece leaving about 1.5" tail. Stitch close to the buckle as shown in picture 9.


Take the male or pronged piece and thread it on so the prongs are facing the buckle and slide close to the buckle.  Flip over to backside and thread tail back through the tri-buckle. Stitch as shown in pic 11.


Lastly, thread the D-ring on (don't worry about where it's at right now). Next thread the female end of the buckle on.  Stitch as shown in pic 13.  Now slide the D ring as close as possible to the end and stitch to the right of it as shown to secure it in place.


To make a removable bow tie, cut one piece 5X4" and one piece 5X2.5".  Fold larger piece in half right sides together and stitch leaving a small opening to turn.  Turn and press. Stitch close to opening.  For center piece, fold lengthwise, right sides together and stitch along long edge. Turn and press.  Gather the bow portion, lay the center piece on top and stitch to attach to the bow.  Stitch edges of center piece (make sure it's a large enough opening to slip over the hardware and onto the collar).


I know it SEEMS confusing and a lot of work but it REALLY isn't.  The hardware I ordered also came with instructions so between that and looking at how a collar is assembled, it was easy to figure out.  Once you do one or two, you'll have it down and you'll be off to saving a boatload of cash and making lots of custom collars for you pet!


You can't really tell because Hudson REFUSED to look at the camera but he's wearing one with glittery shamrocks on it.


Just think of all the possibilities!  Every season, every holiday, your pup can have a special collar.  And they're washable too! Just wash and hang to dry.


They grow up so fast, don't they????? LOL

Friday, February 15, 2019

Valentine's Day Breakfast


I love Valentine's Day. I love Breakfast.  Combine the two and it's one of my favorite things to do . . . create a Valentine's Day breakfast!


After making a big fritatta, I used a large cookie cutter to cut heart shapes and a smaller one to use up the scraps.  Of course don't throw away the uncut scraps! Those are for the next day!


Now had I not lost track of these, they would have looked much more like heart-shaped bacon lol! Baked in the oven, these are easy and no mess . . . just be sure to check often!


Strawberries sliced in half with a "V" cut in the top look like little, red hearts!


Ahhhhh . . . biscuits.  How I love a good biscuit.  This recipe is from Tracey's Culinary Adventures.  It is. By far. The best. Biscuit recipe I've ever used and the only one I use.  I think it's not only the honey and buttermilk but the METHOD that makes these a stand out.  By folding the dough several times (see her recipe and instructions), you get these wonderful, flaky layers.  I'm not kidding.  You will never want to make biscuits any other way ever again!


Just look at all of those fluffy, buttery layers . . .


Plated and ready to be enjoyed . . .


Add some pink grapefruit juice, candlelight and a good, hot cup of coffee and there you have it! A simple, HEART-warming breakfast.

Monday, February 4, 2019

Vintage Style Valentine Ornaments


I'm having a lot of fun making ornaments for my Valentine tree!  Last week I saw these double heart, cardboard ornaments in a gift shop.  They were so cute but they were 12.00 each! No thank you.  I made a few mental notes and came home to make my own version.


I started by printing out some vintage Valentine images. A smaller heart template was used for the image itself and a slightly larger one for the red background.  I used pinking shears to create the edges.


You could embellish these however you like. I had some Stickles glitter paint so I just added a few touches of that.  To get the glittered edges, I watered down a bit of white glue.  Using a brush, I painted the edges with the glue.


Sprinkle on some ultra fine glitter while the glue is wet.  After these dried, I turned them over and gave them a 'flick' with my finger to pop off any excess glitter.  I also brushed them off with a small brush to remove some.


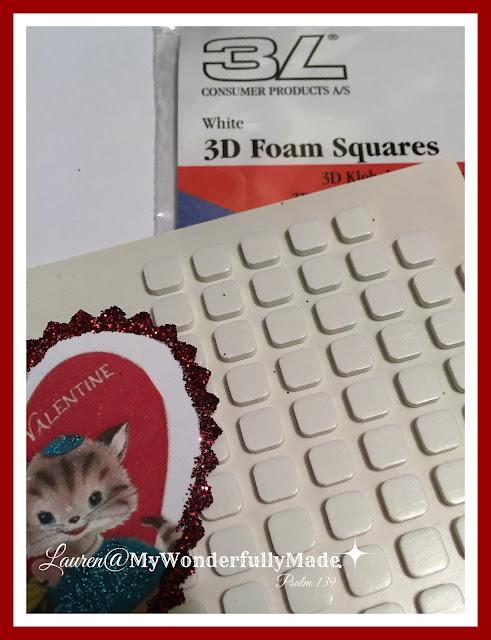
You could just glue the image to the larger heart but I decided to give it a little more dimension with these small foam squares.  


For the hanger, I knotted a piece of cording and adhered it to the back with another piece of card stock glued down.  Afterwards I thought I could have just attached another whole red heart on the back and it would have looked neater. Oh well.  Don't look at the back!


I'm pleased with how they turned out.


These would be cute for an Easter tree cut in egg or flower shapes too.  


These are just two layers but three would be pretty too!


A simple, fun craft that would also be cute tucked into a card or on top of a gift!