Friday, September 22, 2017

Lighted Ladder Display and a Giveaway

I have several of these old ladders, including this one that I got for free.  I saw it at a garage sale and asked how much they wanted.  They just said, "Oh, that old thing -- you can have it".  Um . . . OKAY!  I had an idea rattling around in my head in the middle of the night when I couldn't sleep (thank you menopause) and this is the result.
I've been using this paint by Rust-oleum, "Chalked" which is a SPRAY chalk paint and I love it!  For this project I used Serenity Blue.  The actual color is more of a pale, 'true' blue than the cap color which appears to be more of a pale green-blue but I still loved the look.  I'm giving away two cans of this paint to two winners so be sure to read the end of this post for details on entering to win!
I like the paint splattered, rusty, corroded metal parts so I carefully taped those off and then gave this two quick coats, removed the tape and voila! I hadn't even noticed that some of the paint splatters actually matched the new color!
Now the really fun part.  I knew I wanted to add lighting so I purchased some inexpensive 'tap' lights at my local Big Lots (3/6.00).  They're battery operated and easy to attach with a stick on pad.  They are pretty bright, LED lights so I cut a few pieces of decorative paper and attached those over the light to 'dim' it a bit.
To add even more softness and character, I added a fabric panel to the back.  I had these beautiful, shear curtains that no longer match my bedroom so I cut one and used it for this project.  It has a delicate, embroidered leaf pattern that I love.  I wanted to make it washable so I attached using velcro at the top edge and two small pieces at the bottom of each leg.
  Wouldn't it be fun to make different panels for different seasons??
This could be a fun display in any room of the house.  You could also use it as a side table, plant display -- lots of possibilities!
By adding the books, you get a little more 'ledge' depth for adding other items.  Now that I think about it, you could even attach the books if you wanted using E600 or screws!  Hmmmmmmm .  .  .
Now for the Giveaway!
Thanks to Rust-oleum, I'm able to give away two cans of their Chalked spray paint to two winners! The winners will get to choose two different cans of paint.  Click HERE to see what the colors look like.  The colors I have available are:

Charcoal
Linen White
Serenity Blue
Coastal Blue

For a chance to win, you get 

one entry if you follow/like me on Facebook (link at the top of my blog)

one entry if you become a follower of my blog

one entry for simply leaving a comment on this post.

If you ALREADY follow me on FB and/or are already a follower, please let me know that in your comment so you get the entry!

Because of restrictions on shipping the paint, I am unable to extend this offer to those outside of the U.S.

I'll be taking a short blog break soon but will announce the winners on OCTOBER 13.  

On any given week (depending on how busy I am!) I love to participate in Link Parties.  These gals put a lot of time and effort into hosting these parties so I always want to show my appreciation by directing my readers to these blogs. 

Monday

Tuesday

Wednesday

Thursday

Friday

Sunday, September 17, 2017

Another SPRAY Chalk Paint Project & A Give Away

Recently I tried Rust-oleum's Chalked Spray Paint on a vintage cabinet and really fell in love with this product!  Rust-oleum was kind enough to offer me several different colors to try and this is the second project I completed. It's for sale if you are interested!
One of the many reasons I love this paint is that it makes it so much easier to get into spaces like the inside of this magazine rack and not come out with an arm and hand full of paint from a paint brush!
The second reason I love it is it dries SUPER fast! Now I was working on this piece outside on a warm day but seriously, by the time I completed this first coat, it was dry and I was able to immediately apply the second coat!
As I've said before, the cost probably works out to be the same as AS Chalk Paint quarts because I used 1 and 1/2 cans on this project.  So it's not necessarily the cost that makes the difference for me, it's the ease of application and the smooth, chalky finish you get.  I did a little bit of distressing and finished with a coat of clear wax.
I knew I wanted to do something with these panels on all four sides so I used some vintage book pages from a French school book.
The book is old and naturally 'aged' so I just tore up the pages and applied with Mod Podge.  
I finished with another thick coat of Mod Podge after the first dried to really seal it well.
I love how this turned out and since the paint dried so quickly, I completed this entire piece in just a few hours.
And now for the Giveaway!  Thanks to Rust-oleum, I'm able to give away two cans of their Chalked spray paint to two winners! The winners will get to choose two different cans of paint.  Click HERE to see what the colors look like.  The colors I have available are:
Charcoal
Linen White
Serenity Blue
Coastal Blue

For a chance to win, you get

one entry if you follow/like me on Facebook (link at the top of my blog)

one entry if you become a follower of my blog

one entry for simply leaving a comment on this post.

If you ALREADY follow me on FB and/or are already a follower, please let me know that in your comment so you get the entry!

Because of restrictions on shipping the paint, I am unable to extend this offer to those outside of the U.S.

Trust me -- you will LOVE this paint!

I'll be taking a short blog break soon but will announce the winners on OCTOBER 13.  


On any given week (depending on how busy I am!) I love to participate in Link Parties.  These gals put a lot of time and effort into hosting these parties so I always want to show my appreciation by directing my readers to these blogs. 


Monday

Tuesday

Wednesday

Thursday

Friday


Sunday, September 10, 2017

Vintage Cupboard Door Sconce Lights

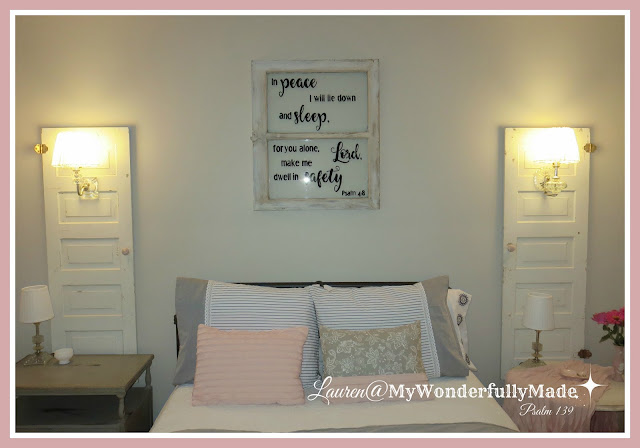
 Here's another project in my bedroom makeover.  A dear friend of mine gave me a stack of these old cupboard doors (I have just ONE left!) and I've used them in several rooms in the house.  One became a retro message board in my kitchen and two became coat hook racks in my closet turned mudroom.  And now these two are holding vintage glass wall lamps in the bedroom.
 I really did very little to these to get them ready.  I removed the hardware and painted the little knob (I may replace it with a glass knob eventually).  I drilled a large hold for the lamp cord to slip through.  And THIS is the beauty of this project:  No special wiring into the wall needed!  The wire runs down behind the door and plugs into an outlet already in the wall! That's it.  I did decide to clean up the hinges although leaving them as is or removing altogether would also be an option.
This is by far the easiest and best method for removing layers and layers of old paint on hardware and all you need is an old pot, baking soda and water.  Now because these are so old, they still have a worn look to them but that's fine with me.  Here is a link to detailed instructions on how to do this -- super easy and no harsh chemicals!
You could of course use any doors or even reclaimed wood and any sconces.  I found this gorgeous one at a local flea market for just 8.00.  But the lady only had one.  I debated and debated then decided to buy it in the hopes I'd find another similar one online.
And thank you Ebay . . . because a few days later, I found this one.  I made sure that they were both the same height and extended out from the wall the same distance.  This one was a bit more pricey at 25.00 but it was so worth it to have it.  Even though it's different, it's the same style/era and I actually LOVE that they ARE different.
I found my biggest challenge was finding shades for these! They were either too big or too small.  I found these at my local IKEA and I think they're perfect.  I love the gathered fabric -- to me they still have that vintage look to them.
Here's a peek at the room so far with the doors, the window and side tables I re-did.  A few more projects to go and I should be finished.
These sconce lights are a great way to add wall lighting without having to do wiring into the wall -- quick and easy!

On any given week (depending on how busy I am!) I love to participate in Link Parties.  These gals put a lot of time and effort into hosting these parties so I always want to show my appreciation by directing my readers to these blogs. 
 
Monday
Tuesday

Wednesday

Thursday
Friday


Tuesday, September 5, 2017

Vintage Bali Hai Dresser Makeover

It took me awhile to find a dresser to makeover for our bedroom but one Saturday we were at our local thrift store and the only tall dresser there . . . was this.  It was PERFECT.  It had a yellow finish but I loved the details and the faux bamboo trim. The price was just right . . . 40.00.  I knew it was a quality, old piece but I didn't realize just HOW good it was until I got home and started taking the drawers out.
This was inside one of the drawers.  So I did a little research and it appears that this is a Henry Link Bali Hai Faux Bamboo piece.  Henry Link was a furniture designer in the late 1950's - early 1960's.  At that time, he worked with the Dixie Furniture Company in Lexington, NC. The company still exists today as the Lexington Furniture Company but these pieces are no longer made.  Today this dresser goes for 200.00-500.00.  The other pieces (like the low dresser with mirror) go for upwards of 600.00!
I normally replace hardware but in this case, these totally went with the piece so all I did was use Rustoleum Chalked spray paint on them and then dry brushed them with white chalk paint.  
The white dry brushing really brought out the details on the hardware.  I used two coats of AS White Chalk Paint on this piece.
A little distressing, some clear wax and a few touches of dark wax and I was pleased with the result.
It's the perfect piece for my shabby chic bedroom makeover and knowing that it's a quality piece of furniture makes it that much sweeter!


On any given week (depending on how busy I am!) I love to participate in Link Parties.  These gals put a lot of time and effort into hosting these parties so I always want to show my appreciation by directing my readers to these blogs. 


Monday


Tuesday


Wednesday


Thursday


Friday