Tuesday, December 18, 2018

Christmas Ornament Exchange


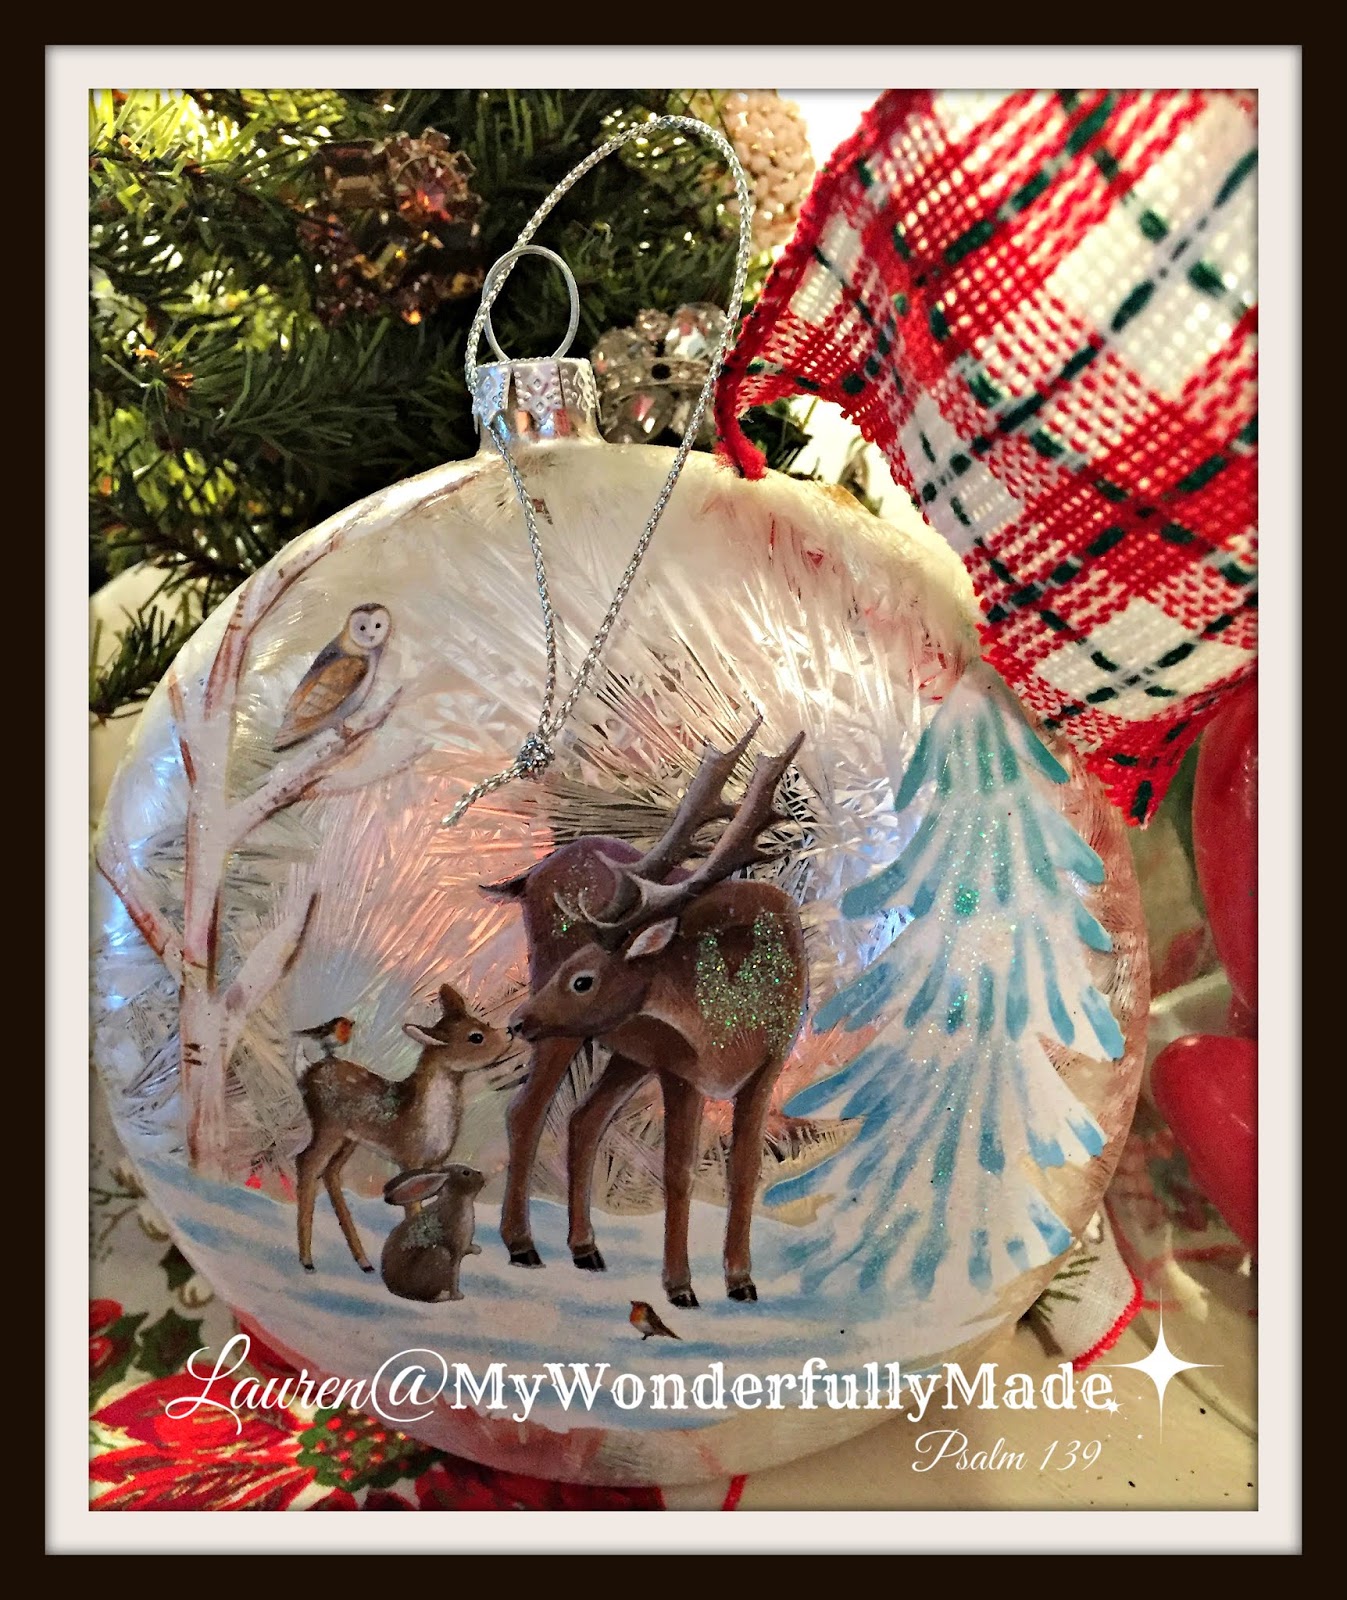
Recently I participated in a wonderful ornament exchange hosted by sweet Stephanie at The Enchanting Rose.  My gift box came from a blogger who truly is a 'kindred spirit', AnnMarie at Musings of a Vintage Junkie.  AnnMarie and I love a lot of the same things and her wonderful gifts reflected such kind thought and care!  This ornament is SO beautiful! Most of my Christmas decorations are blues, whites and silver so this is perfect, not to mention absolutely stunning!


My box was packed with lots of wonderful surprises!


Not only the beautiful ornament but this antique Ball jar filled with vintage light bulbs!


Perfect next to my little tree with vintage earrings on it!


Also included were this wonderful CD that friends of hers recorded and two books.  I've so enjoyed the Walk Through Advent book and the Daily Bread.  I told AnnMarie I grew up watching my mom read her Daily Bread each afternoon.  


The ornament is front and center on my little tree (We opted for a small, artificial tree in the bay window this year as our puppy Hudson would have probably drove us nuts with a large, on the floor, real tree!).


This is the package I put together for my swap partner.  She didn't have a blog so I snapped some pictures before I wrapped it all up.  Carol's favorite colors are periwinkle blue and pink so I found some things in those colors.  Carol also loves vintage like me so it was easy to find fun things to include like this vintage Christmas card, gift tags and hankie.  I added a fun set of battery operated fairy lights.


For the ornament, I included one of my mittens made from vintage linens and trims,


I'm always on the look out for these mini leather books. I included this one by Washington Irving.


I added this wonderful Advent book by Matt Chandler and a pretty, vintage doily.  

As always, Christmas has crept up on us and will soon be here and gone.  I'm grateful for God's faithfulness this past year and His mercy in sending His Son as our Savior.

Blessings to you all my friends!

Monday, December 10, 2018

Reclaimed Wood Christmas Gifts


I love using reclaimed wood and old fence boards for artwork.  I've used them for lots of projects like these:


I wanted to make small pieces of art to give as gifts this Christmas.  I started with these fence boards that I cut to 5.5" in length.  Using my sander, I smoothed the edges.


While I do like Annie Sloan Chalk Paint for furniture, I prefer Rustoleum's Chalked for other projects.  It's much less expensive and still gives the chalk paint look and effect.  I gave these pieces a watered down wash of the white chalk paint.


I leave a lot of the wood showing to give it a more natural, weathered look.  While this is drying, you can get your quotes, words, etc. ready to apply.


The words are printed on tissue paper (see tutorial link above) and then I tear the edges.  I've changed up my 'mix' from time to time but basically I use a combination of Mod Podge, Gesso and water.  The Gesso is white so it helps the tissue blend in better with the wood BUT, it also means the letters are hidden more as shown above.  


Using a clean piece of towel, immediately blot over the letters to make them stand out again.


Here you see the progression.  After this dries, I use my sander to remove even more of the paint and tissue, blending it so the edges of the tissue 'disappear'.


I like to give a wash of paint to the backs and for these I attached picture hangers.


Each one comes out looking slightly different and unique.  These snippets of Christmas songs make nice, short quotes for these tiny boards.


May you feel that "thrill of hope" as we celebrate the coming of our Savior in coming weeks!

Saturday, November 24, 2018

Vintage Linen Mitten Ornaments


While making my mitten banner from vintage linens, I decided I'd enlarge the mitten pattern and make some individual ornaments.  I love vintage linens and this is a great way to use them, especially if they have stains or holes.  You can still preserve the beauty of the stitching and designs by making small projects with them.


Try to incorporate the pretty edgings as well.  I cut them apart and created the top edge of the mitten with several different ones.  Then make a 'sandwich':  Right sides together of the mitten  front and back (include the band you created on top of the mitten front piece) and on the back add a piece of interfacing to add stability and stiffness to the ornament.


I stitched using a 1/8" seam.  Clip all of the curves. This makes your mitten lay nice and flat.  Turn to outside and press.  Then fold in the top edges, insert your ribbon for hanging, pin and stitch through all thicknesses.


There are lots of ways to embellish the ornament.  I used several medallions of doilies I had cut apart.  You can stitch these on or use hot glue.  To add a little dimension, I kind of 'gathered' up the top medallion then attached it so it stands up a bit.  I have a lot of jewelry I got when my mom passed away that is not 'my style' so this is a wonderful way to use those pieces.  These pieces are all from one very sparkly, large necklace :) which were attached over the medallions with hot glue.  


The rosette was made from a piece of scrap fabric from a tablecloth.  Use a long, basting stitch and stitch the entire length of the piece.  Pull to gather and then roll into a rose.  Stitch the bottom edges to hold it all together.  Then hot glue to the top of the medallion.


You can see you don't need a lot to make these and the possibilities for embellishments are endless!


Don't forget to keep the scraps and edgings and small pieces . . . they can all be used!


This rosette was made from a tiny, tiny piece of a hankie edge no more than 4" long and 1/2" wide.


These are slightly addicting!  They'd make great package decorations or sachets as well as ornaments.
We are expecting our first major snowfall (although these weather people kind of get all 'worked up' sometimes so we'll see!).  Either way, winter is here so time to make the best of it and dream of warm, summer breezes . . .


Sunday, November 18, 2018

Vintage Linen Mitten Banner


While my husband was 'puppy sitting', I was able to get to my craft room and actually "Create"!  I dug into my stash of vintage linens and doilies and came up with this winter banner.
This is a great way to use linens that have stains or tears on them but still have areas with pretty designs that you want to use and preserve.  I made a mitten pattern and then traced it onto the linen pieces.
You'll want to cut a front, back and a piece of medium weight interfacing for added body and stiffness.  When using very thin fabrics (i.e. vintage hankies), I actually fused interfacing to the back of both pieces.  
Assembly for stitching:  Right sides together of fabric pieces and interfacing piece on top of either the front or back, it doesn't really matter which.  I used a scant 1/8" seam.
Stitch leaving the 'wrist' edge open.  Before turning right side out, carefully clip the curves to give a nice, flat seam.
Press the mitten.
A zig zag stitch on the edge helps prevent fraying.
These were once large doilies that I cut apart.  You can't tell in this picture but the ones on the right have a pretty, turquoise blue center.  Since I decorate with a lot of blue for Christmas, I chose linens and these doilies with blue accents in them.

The small blue and white doily medallions were folded and stitched over the top edge of each mitten.
Left over burlap scraps were used to make little pennants and the other doily medallions were stitched on top.  I also used a zig zag stitch around the edges of these to keep the burlap from raveling.
Cotton cording was stitched to the backs of the pieces to create the banner.  
I liked this but wanted to add 'just a little something' more.  Vintage ribbons would have been pretty but I didn't have enough so I dug through my stash and found a piece of a vintage curtain.
I used pinking shears and cut strips of the fabric and tied the strips in between each mitten and burlap pennant.  Being a 'winter hater', I feel like this is a good compromise.  
Mittens . . . with flowers on them haha!
I haven't started decorating for Christmas and quite honestly, probably won't do a lot this year.  With a puppy in the house, having a tree would probably be crazy so we may just put a small tree on a table in the corner instead.
Hudson seems to like the snow (although he sure looks grumpy in this photo!).  This day the flakes were bigger than his nose and he couldn't quite figure it all out.  
So this year, I'll set aside a lot of the Christmas decorations, especially if I want them to remain in one piece!

Thursday, November 15, 2018

Puppy Update . . . Because This Is All I Can Offer Right Now

 This is it.  This is my life.  And my vocabulary has been reduced to just two words, "Hudson, NO!".  He's 12 weeks today.  He's 4.5 lbs. of cuteness. He's not the sharpest crayon in the box when it comes to potty training.  He wears me out.  


He loves the leaves and (sadly to ME) has already experienced snow.


Our version of "Where's Waldo?"


SO, until this puff ball learns some manners and realizes pooping and peeing in the house is not the norm, I'm reduced to just looking at all of the great projects others are doing and saving pins to my Pinterest boards for that one day (hopefully in the not too distant future!) when I will have a life again.

Sunday, October 28, 2018

New Puppy = No Time for Blogging!

 You'll excuse me for my absence but I've had my hands full!  Hudson Taylor has made his appearance and while he IS awfully cute . . . 


. . . he's two pounds (actually almost 2.5 now!) of boundless energy, constant chewing and always on the look out for a nice place to potty . . . inside.


He's as sweet tempered as he can be . . . and he is ALWAYS either on our feet, behind our feet, in between our feet or making his way TO our feet.  


He loves to play outside which means baths are quite common.


And of course, like all babies . . . he requires lots and lots of sleep.  

So you'll pardon me for a while as I can see this little guy is going to give me a run for my money on the training front!  Good thing he's so CUTE!!