We are expecting our first grandchild! A precious, little baby boy in May! And we are SO excited! I used to sew for my three kids all the time and now I'm getting to sew for a little one again and let me tell you, it is SO much fun! Aside from buntings, I've been working on blanket and burp cloth sets. I did some research and found that the kidney shaped cloths are preferred so that's the shape I went with. There are lots of tutorials but I found that this one from Mabey She Made It to have the most helpful suggestions as well as a pattern to download. I chose to use flannel for the cloths and blankets. Be sure to wash and dry your fabric to pre-shrink.
I enlarged the pattern a bit to make a larger "kidney shape" but these are SO simple! Just cut out two pieces, pin right sides together and stitch leaving an opening to turn. Before turning though, I zig-zagged the edges and clipped the curves. After it was pressed, I stitched 1/8" from the entire edge. (I'll give you the amounts of fabric I used at the end of this post.)
For the blankets, I used two coordinating flannels. I first cut the front of the blanket to the size I wanted. Mine was 38" Wide by 43" Long. Next, cut the back (which will also be the binding) 3" LARGER in BOTH length and width from the front piece. So my back piece was 44" Wide by 49" Long.
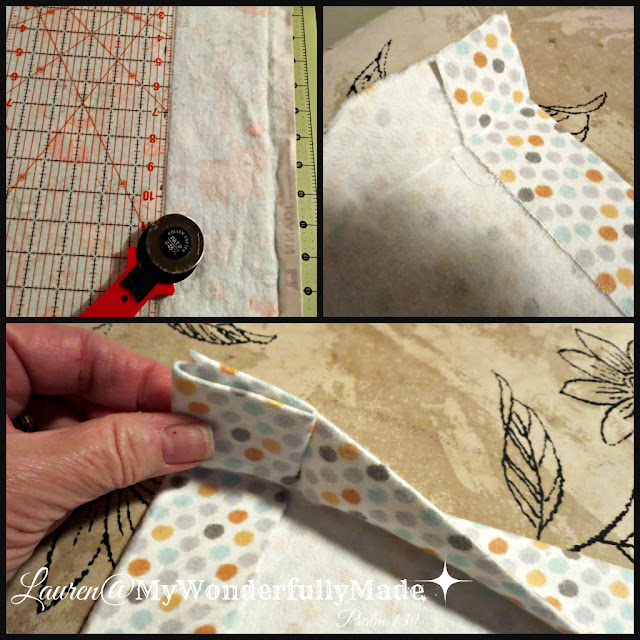
Begin creating the back/binding (See photos above). The first photo is just showing you how I trimmed the pieces to size. Next, fold the edges in 1.5" all the way around and press. Then, fold in again 1.5" all the way around and press.
To create mitered corners: Unfold so you just have the first 1.5" fold open. Using a ruler, mark down each side from the corner 3" and mark. Draw a line from mark to mark as seen in second photo. Now fold bringing lines together and stitch on the line. Trim seam. NOW, if this makes NO sense to you ignore all of my instructions and just watch this video . . . I'M a visual learner so this was super helpful!
Once your corners are all mitered and your binding is neatly pressed, you're ready to insert the front panel of your blanket.
Lay the front panel under the binding edges.
Start at the top edge and work side to side, smoothing and pinning the panel into the binding. You want to take your time on this part, making sure the panel is even and flat.
BASTE the panel first. This way, if you get to the bottom edge and the panel is not fitted in properly or flat, you can just remove the basting and re-position the panel. Another tip, don't baste all along . . . it will take you FOREVER to remove even the large basting stitches. Instead, baste 5 or 6 stitches, lift your presser foot and pull forward 4-5 inches, baste a few more stitches, pull forward, etc. which is what you see above.
After basting, press carefully, making sure there are no bumps and the panel is flat. Then you can stitch close to the inner edge of the binding and remove your basting.
These are so fun and easy to make and tied with some extra fabric, make such a cute baby gift! The blankets and burp cloths are double thickness so super soft!
One final touch, each blanket is stitched with my "Love" Grandma Z design
Here are the amounts of fabric I used to make 3-4 burp cloths and one blanket:
Fabric A (Blanket Front and fronts of two burp cloths): 2 yards
Fabric B (Blanket Back/Binding and fronts of two burp cloths): 2.5 yards
Fabric C (Backs of one to two burp cloths): 2/3 yard


